
I always find it interesting to see how other people use SOLIDWORKS. Not just their methodology & the use of the tools and features , but how they have their interface set up and go about their workflow.
SOLIDWORKS provides a wide range of customisation when it comes to how you work within the product. My own personal setup have evolved over the years. Due in part to SOLIDWORKS development of new methods of accessing tools. Along with how I have adopted (& adapted) to these methods.
Before I run through my own set up, let me provide some insight into why I work the way I do. For myself and I speculate, most others, it is about minimizing the amount of mouse travel and the required number of mouse clicks.
 The goal is to try and keep the majority of my mouse movements to a small radius, based around the centre, or more correctly slight right of, centre of my screen.
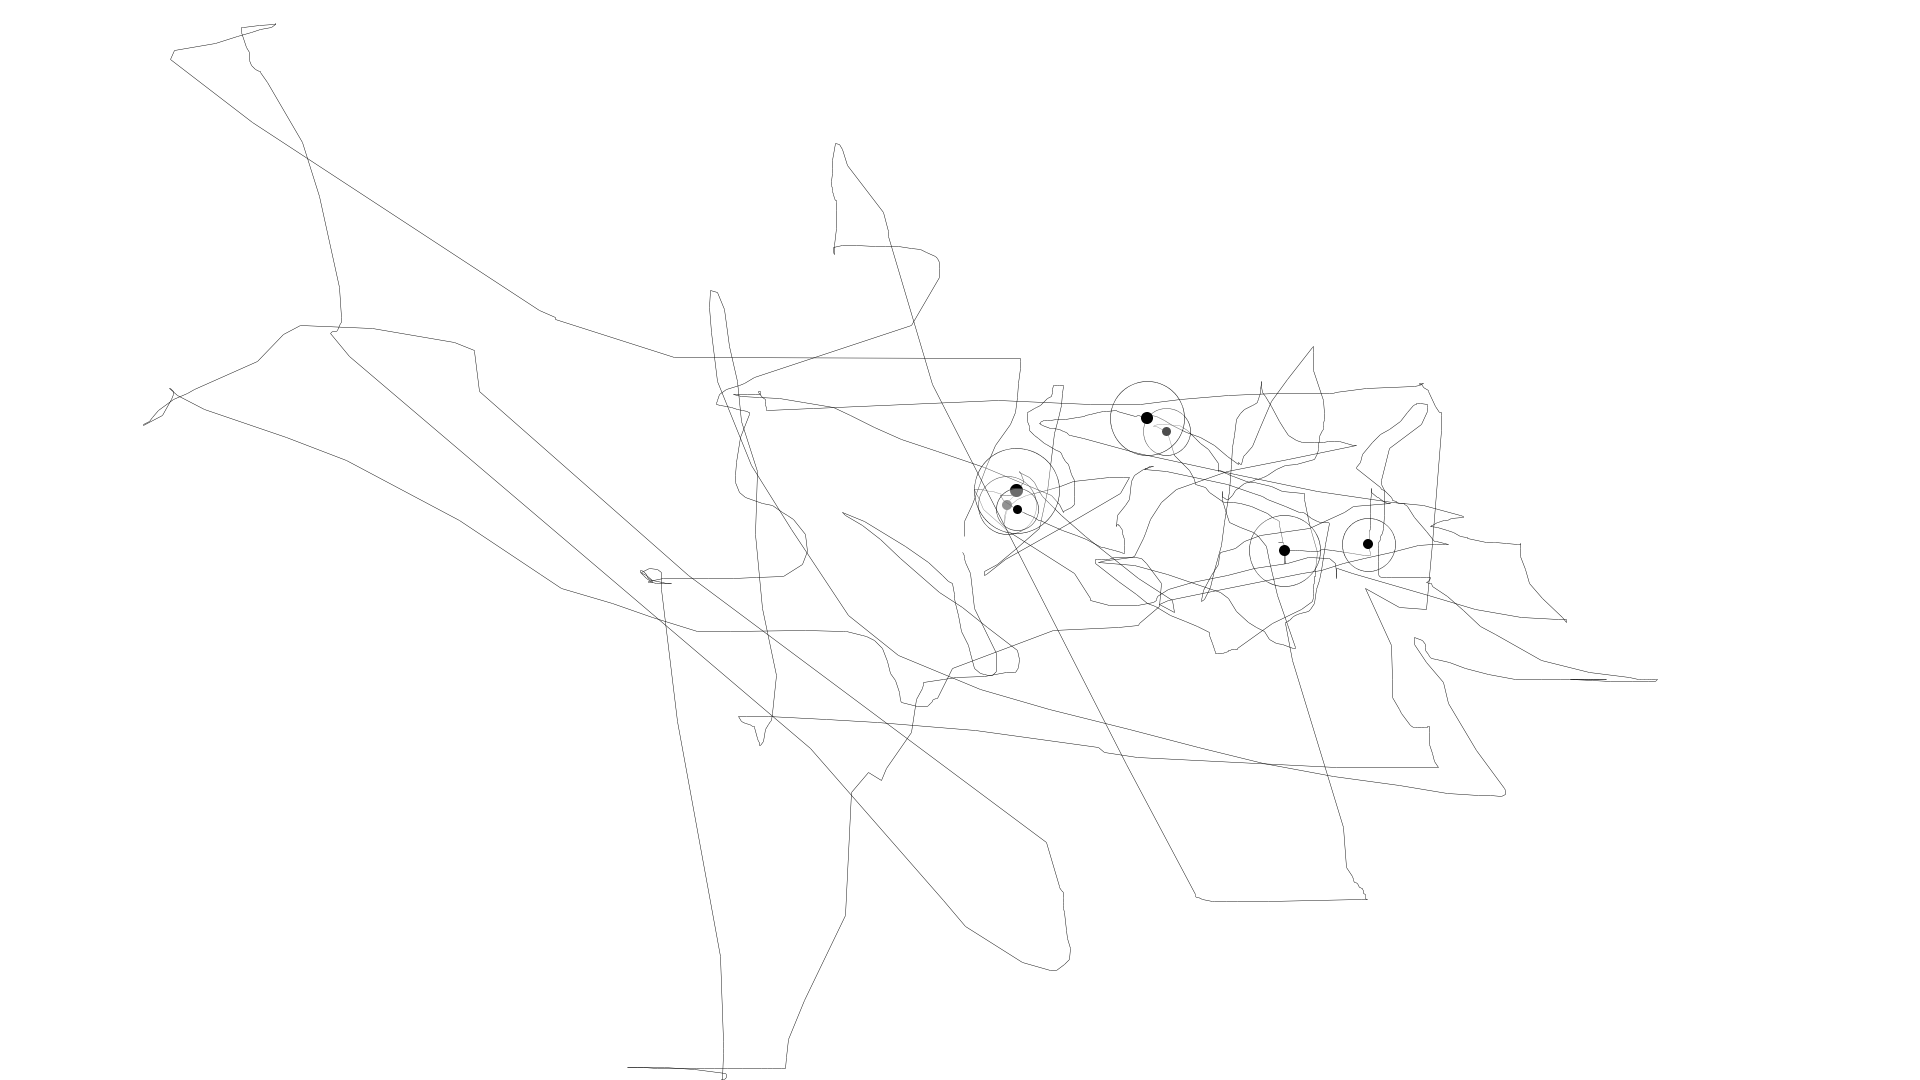
Let me provide an example of that. If I create a simple model consisting of only four features. An extrude, a couple of extruded cuts and a fillet. I’ll first model it without using any of my shortcuts methods. This is the trace pattern of my mouse movement (IOGraphica) to create the model. Using only selections from the toolbar, FeatureManager and the HUD (Heads Up Display)

Now if I create the same model accessing the features via my customised interface. Even with such a simple model you can see the greatly reduced mouse travel, with the majority of selections being slightly right of the centre of the screen.
My workflow consists of using a combination of Keyboard shortcuts, which include using both the default “S” & “D” keys. along with using Mouse Gestures and selecting from the pop up context toolbars.
 Along with customisation of the interface I have a few options I like to have set in Systems Options.
Under Sketch Options, I have Auto-rotate view normal to sketch plane on sketch creation selected. I like this option set. No matter how your model is orientated/ rotated, with a RMB selection on a face or plane, the context toolbar displays. Select new sketch and the model automatically rotates so the selected face is normal to the sketch plane. It is a very rare time that I wouldn’t sketch normal to plane.
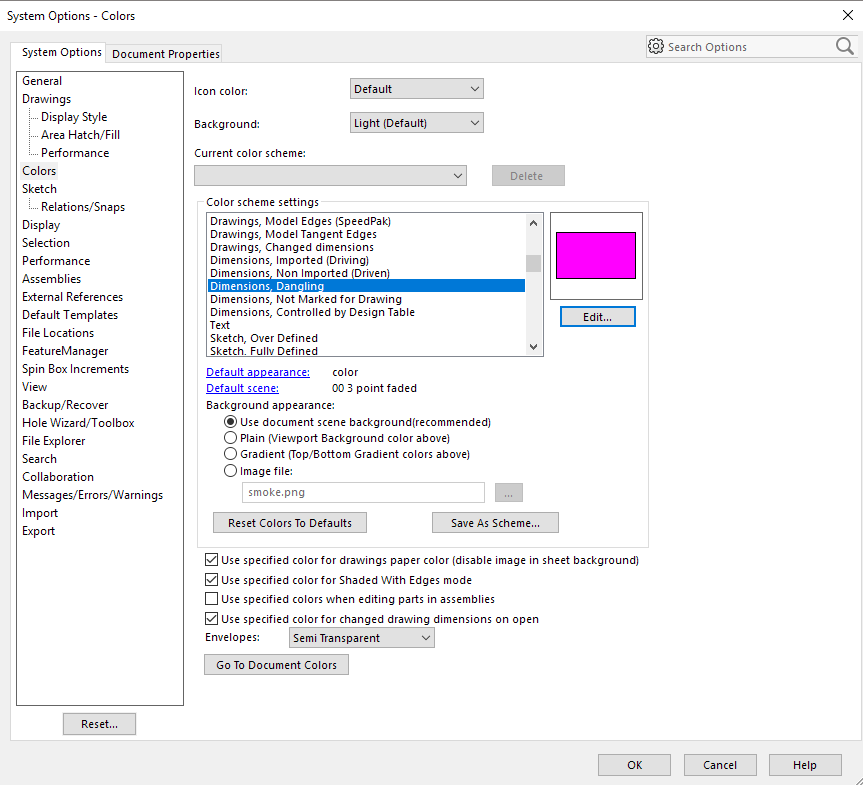 I have two other selections made in System Options. Under Colors> Dimension, Dangling. The default colour is Olive (R128, G128, B0). It is particular difficult to see against the standard grey model and even harder to see against timber grain appearances! What the point of having a warning if you can’t see it. I have it set to Magenta (R255, G0, B255) It’s vibrant and stands out which assists greatly when trying to discover that dangling relation
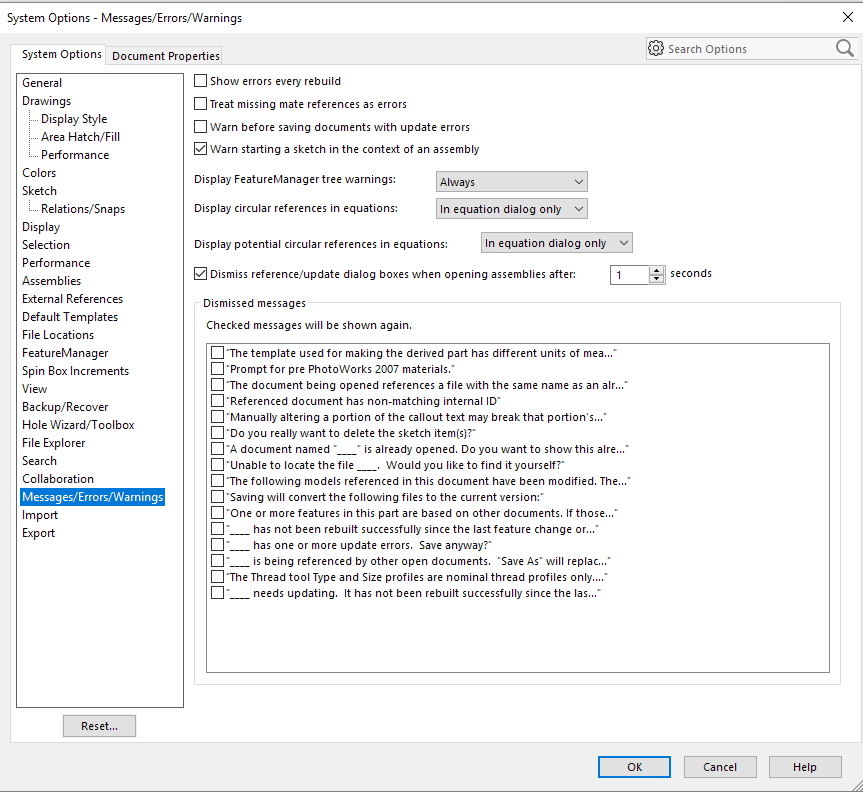 The other selection I have set is under Messages/ Errors/Warning. I select Dismiss reference update dialogue update boxes when opening assemblies after: I have it set at 1 second. Before SOLIDWORKS 2015 you would have to manually respond to ever dialogue box that popped up informing you of parts with missing paths. I don’t care if parts are going to be loaded suppressed or any other warning. I just want my assembly to open in the quickest possible time.
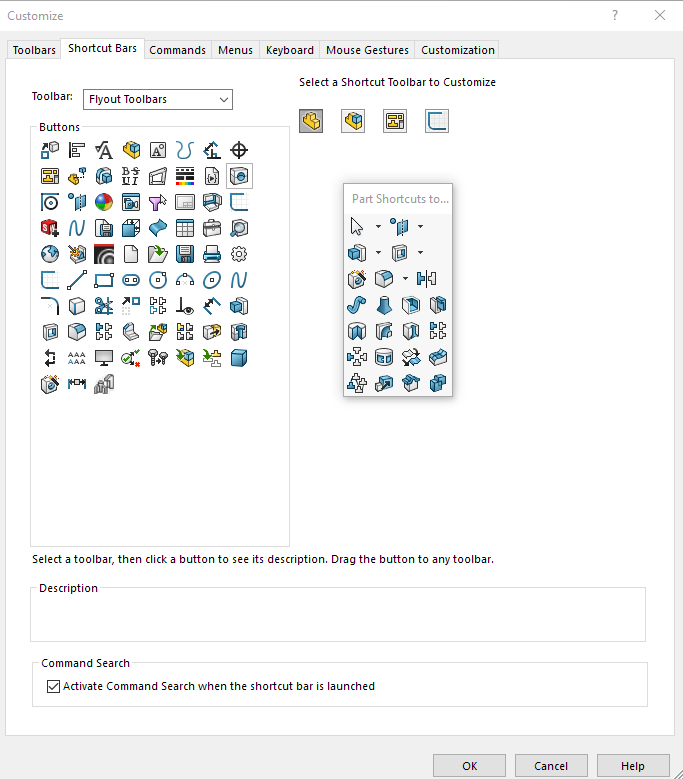
I keep my Toolbars display to a minimum. Both in number and in size . Accessing Customize (Tools> Customize or Options> Customize after activating a model space (a new or opened part). I have the CommandManger enabled. Although I have tried to keep the the need, to access features from the Toolbars, down to a minimal, it is nice to be able to toggle though to another set of tools. Particularly it you are modeling with a combination of solids and surfaces![]() I deselect Large Buttons with text and set the Icon size to small. It surprises me how little I see this changed! No matter how large your screen is, you can never have too much work area! I do have show tool tips active just in case! Sometimes we all need a little help. Although I don’t have a great need to select from the toolbar with the majority of my daily workflow but when I do, the selection is more by memory than sight. A little never goes astray sometimes!
I deselect Large Buttons with text and set the Icon size to small. It surprises me how little I see this changed! No matter how large your screen is, you can never have too much work area! I do have show tool tips active just in case! Sometimes we all need a little help. Although I don’t have a great need to select from the toolbar with the majority of my daily workflow but when I do, the selection is more by memory than sight. A little never goes astray sometimes!
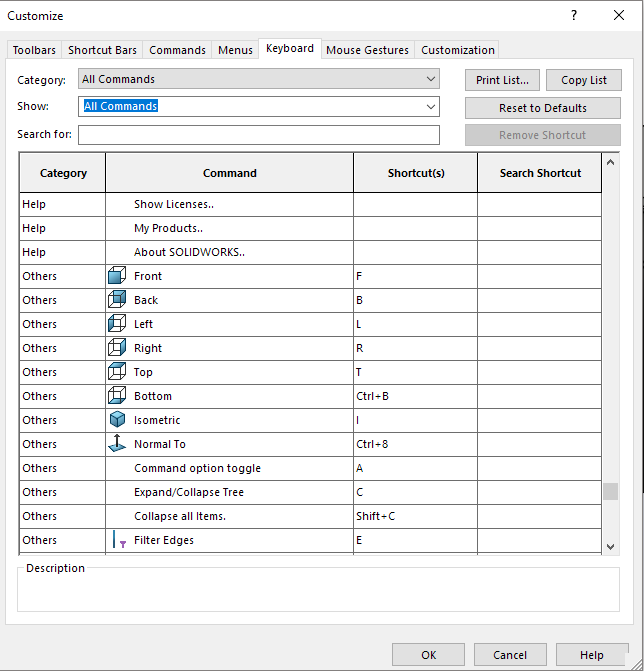 I’m a keyboard shortcut guy! It started went I first moved to SOLIDWORKS as a hangover from my Autocad days. Before the “ribbon” toolbars came along , commands in Autocad were almost exclusively keyboard driven. My keyboard shortcuts have evolved over the years. I now, for the majority of my shortcuts only use the left side of the keyboard. As a Trackball (Logitech M570) user (a little more on that later) I don’t need any great movement with my right arm. So my right hand rests on my trackball and my left palm rests and covers the lower left corner of the keyboard. This way my left hand pivots with the fingers when selecting the required keys, or combination of keys. I use the normal Windows shortcuts, ctrl+c, ctrl+v (copy & paste), ctrl+w (close), ctrl+z (undo), ctrl+s (save). SOLIDWORKS needs ctrl+q (rebuild) and I differ from most people by setting ctrl+a as Save As. SOLIDWORKS originally has ctrl+a as Select All. Personally I found I rarely used that function and find the Save As, as a far better use. I was never a fan of using the space-bar to call up views. Even with the introduction of the View Selector. When the function was added in the Heads Up Display I didn’t find it much better. Both still require additional mouse movement & selection. From very early on I have had the Views assigned as simple. f (front), b (back), l (left), r (right), t (top), ctrl+b (bottom) and i (isometric). Although SOLIDWORKS has r set as default for Recent files again I find it far more beneficial set for view right.
I’ve also become a big user of the Tab + mouse cursor on part to hide (in an Assembly) and Shift+Tab + mouse cursor on part (or more correctly where part was) to again show the part. Using Ctrl+Shift+Tab (holding them selected) will display all the hidden parts transparently. The parts can then be shown by LMB on the required part. This all works in nicely with my left hand position and my other shortcut selection
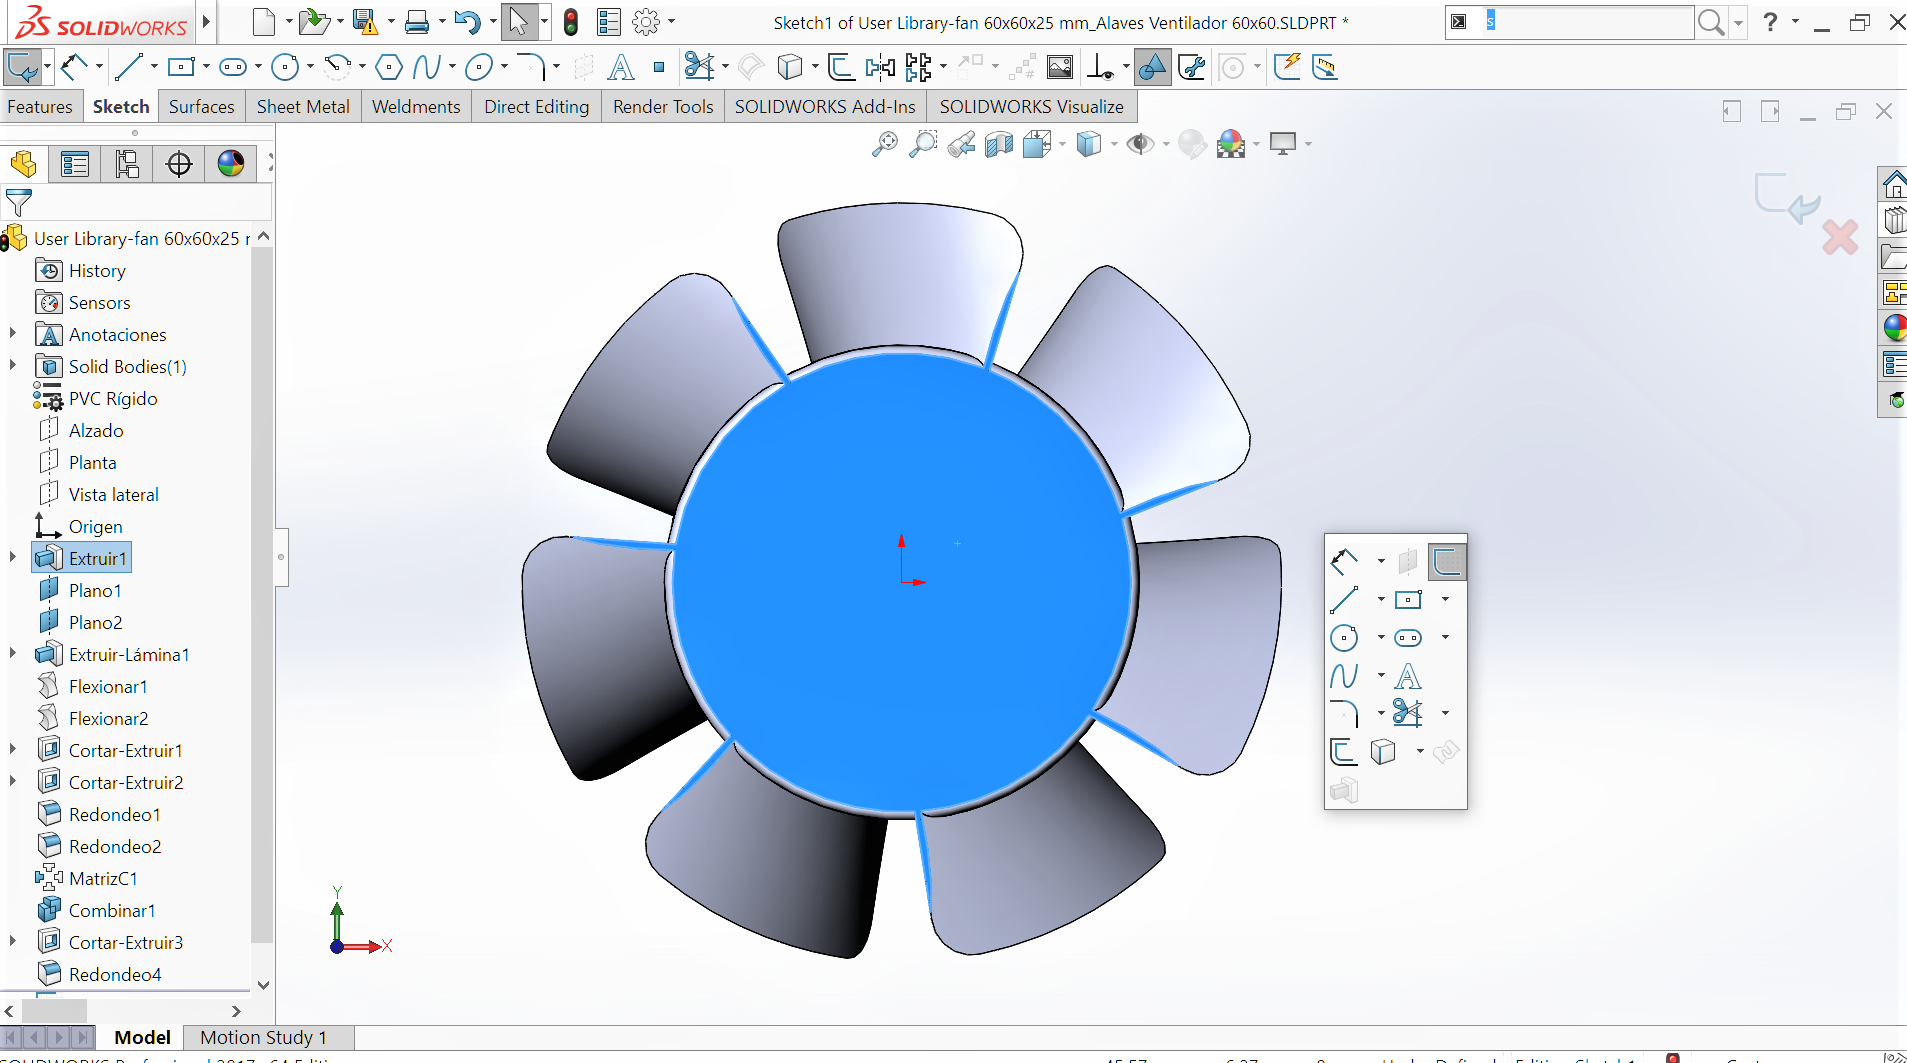
 When SOLIDWORKS introduced the S key shortcut and later the D key shortcut it suited my existing use of keyboard shortcuts . Especially as the keys are grouped within most of my other keyboard shortcuts. The S key shortcut opens the relevant toolbar for the function you are working in. More importantly it open the toolbar at your mouse cursor. If ever there has been a feature to reduce mouse movement this is it. Similarly with the D key. The D key opens a confirmation (tick or cross) toolbar at the position of the mouse cursor. It also works a similar function within Assemblies and the use of Breadcrumbs (more on Breadcrumbs a little further on)

 I’ve always tried to adapt my workflow as SOLIDWORKS has introduced new interface tools. Mouse Gestures are a great complement to my other shortcuts. Mouse gestures display when you hold down the RMB and sweep the mouse to the right. Mouse Gestures can be configured differently for parts, assemblies, drawings and sketches. Features can also be interchanged and are not restricted to just their own groups. I have parts features on with my sketch mouse gesture. I find this gives a very fast workflow for basic modeling. If I use the sample part that displayed the reduced mouse movement, as an example, it gives me a workflow like this.
RMB on plane, new sketch from context toolbar> S key, centre rectangle>mouse gesture up – dimension>select type dimension> enter> mouse gesture right – extrude> D key confirm. This allows for my mouse not to have to move any further than around my sketch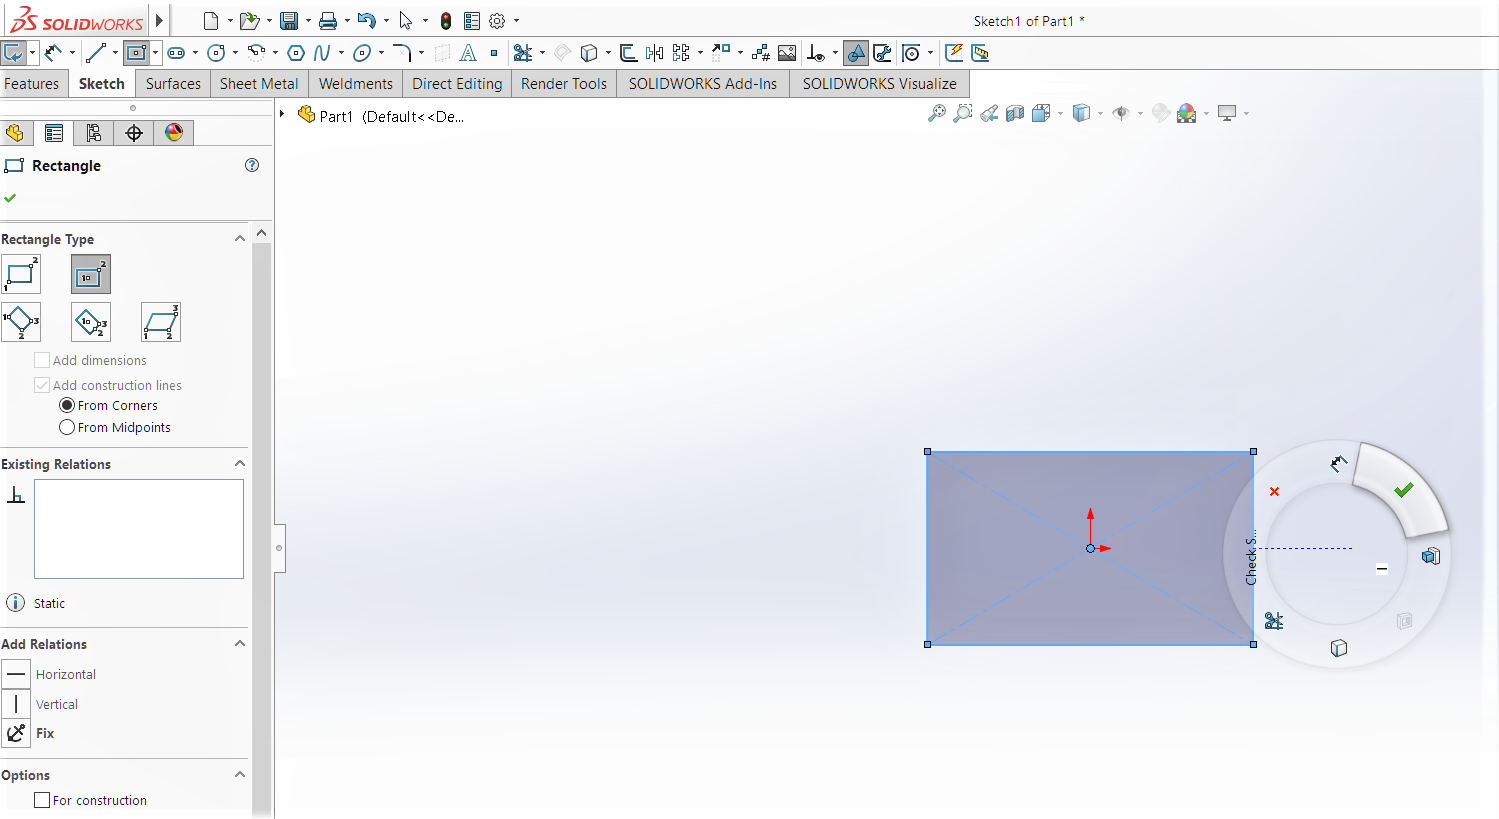
I also have the Measure tool, set to the bottom centre for all of my mouse gestures. Despite having a default M key shortcut I find that requires me to move my hand to reach take key. I find it far more convenient to access via a mouse gesture.
Mouse Gestures are also available when using DraftSight. Although I have them all set I really only use two of the functions whilst in DraftSight. Because we have a specific use for DraftSight I use mouse gestures to Open a file, as we copy many dxfs into a single file and to activate Properties Painter. Again because we need to set lines to layers and colours. You might also notice that I have my Command Window floating. This is kind of a de facto S key toolbar set up that I have adapted to use in DraftSight. I like to the Command Window positioned there as I am more inclined to be looking and working around the centre of my screen.
 For some reason I was reasonably late to adopt using Breadcrumbs …… much to my own determent. I initially dismissed them as just another way to access parts. But they are far more than just that! Again the advantage of being able to bring the Breadcrumb to your mouse cursor, by the D key selection, is worth using them for that reason alone. However it’s greatest advantages is that it provides direct access to all functions associated around the part or sub-assembly in a single isolated toolbar
We all have our individual likes and dislikes when it comes to how we interact with the software. The way my shortcut have evolved over the years and how I have developed my setting has always been based on minimising my body movement by reducing my mouse travel. Which is why I have always been a strong advocate for using a Trackball. Whilst I know I’m in the minority I believe that it is the perfect accompaniment to work in conjunction with how I have my SOLIDWORKS set up.
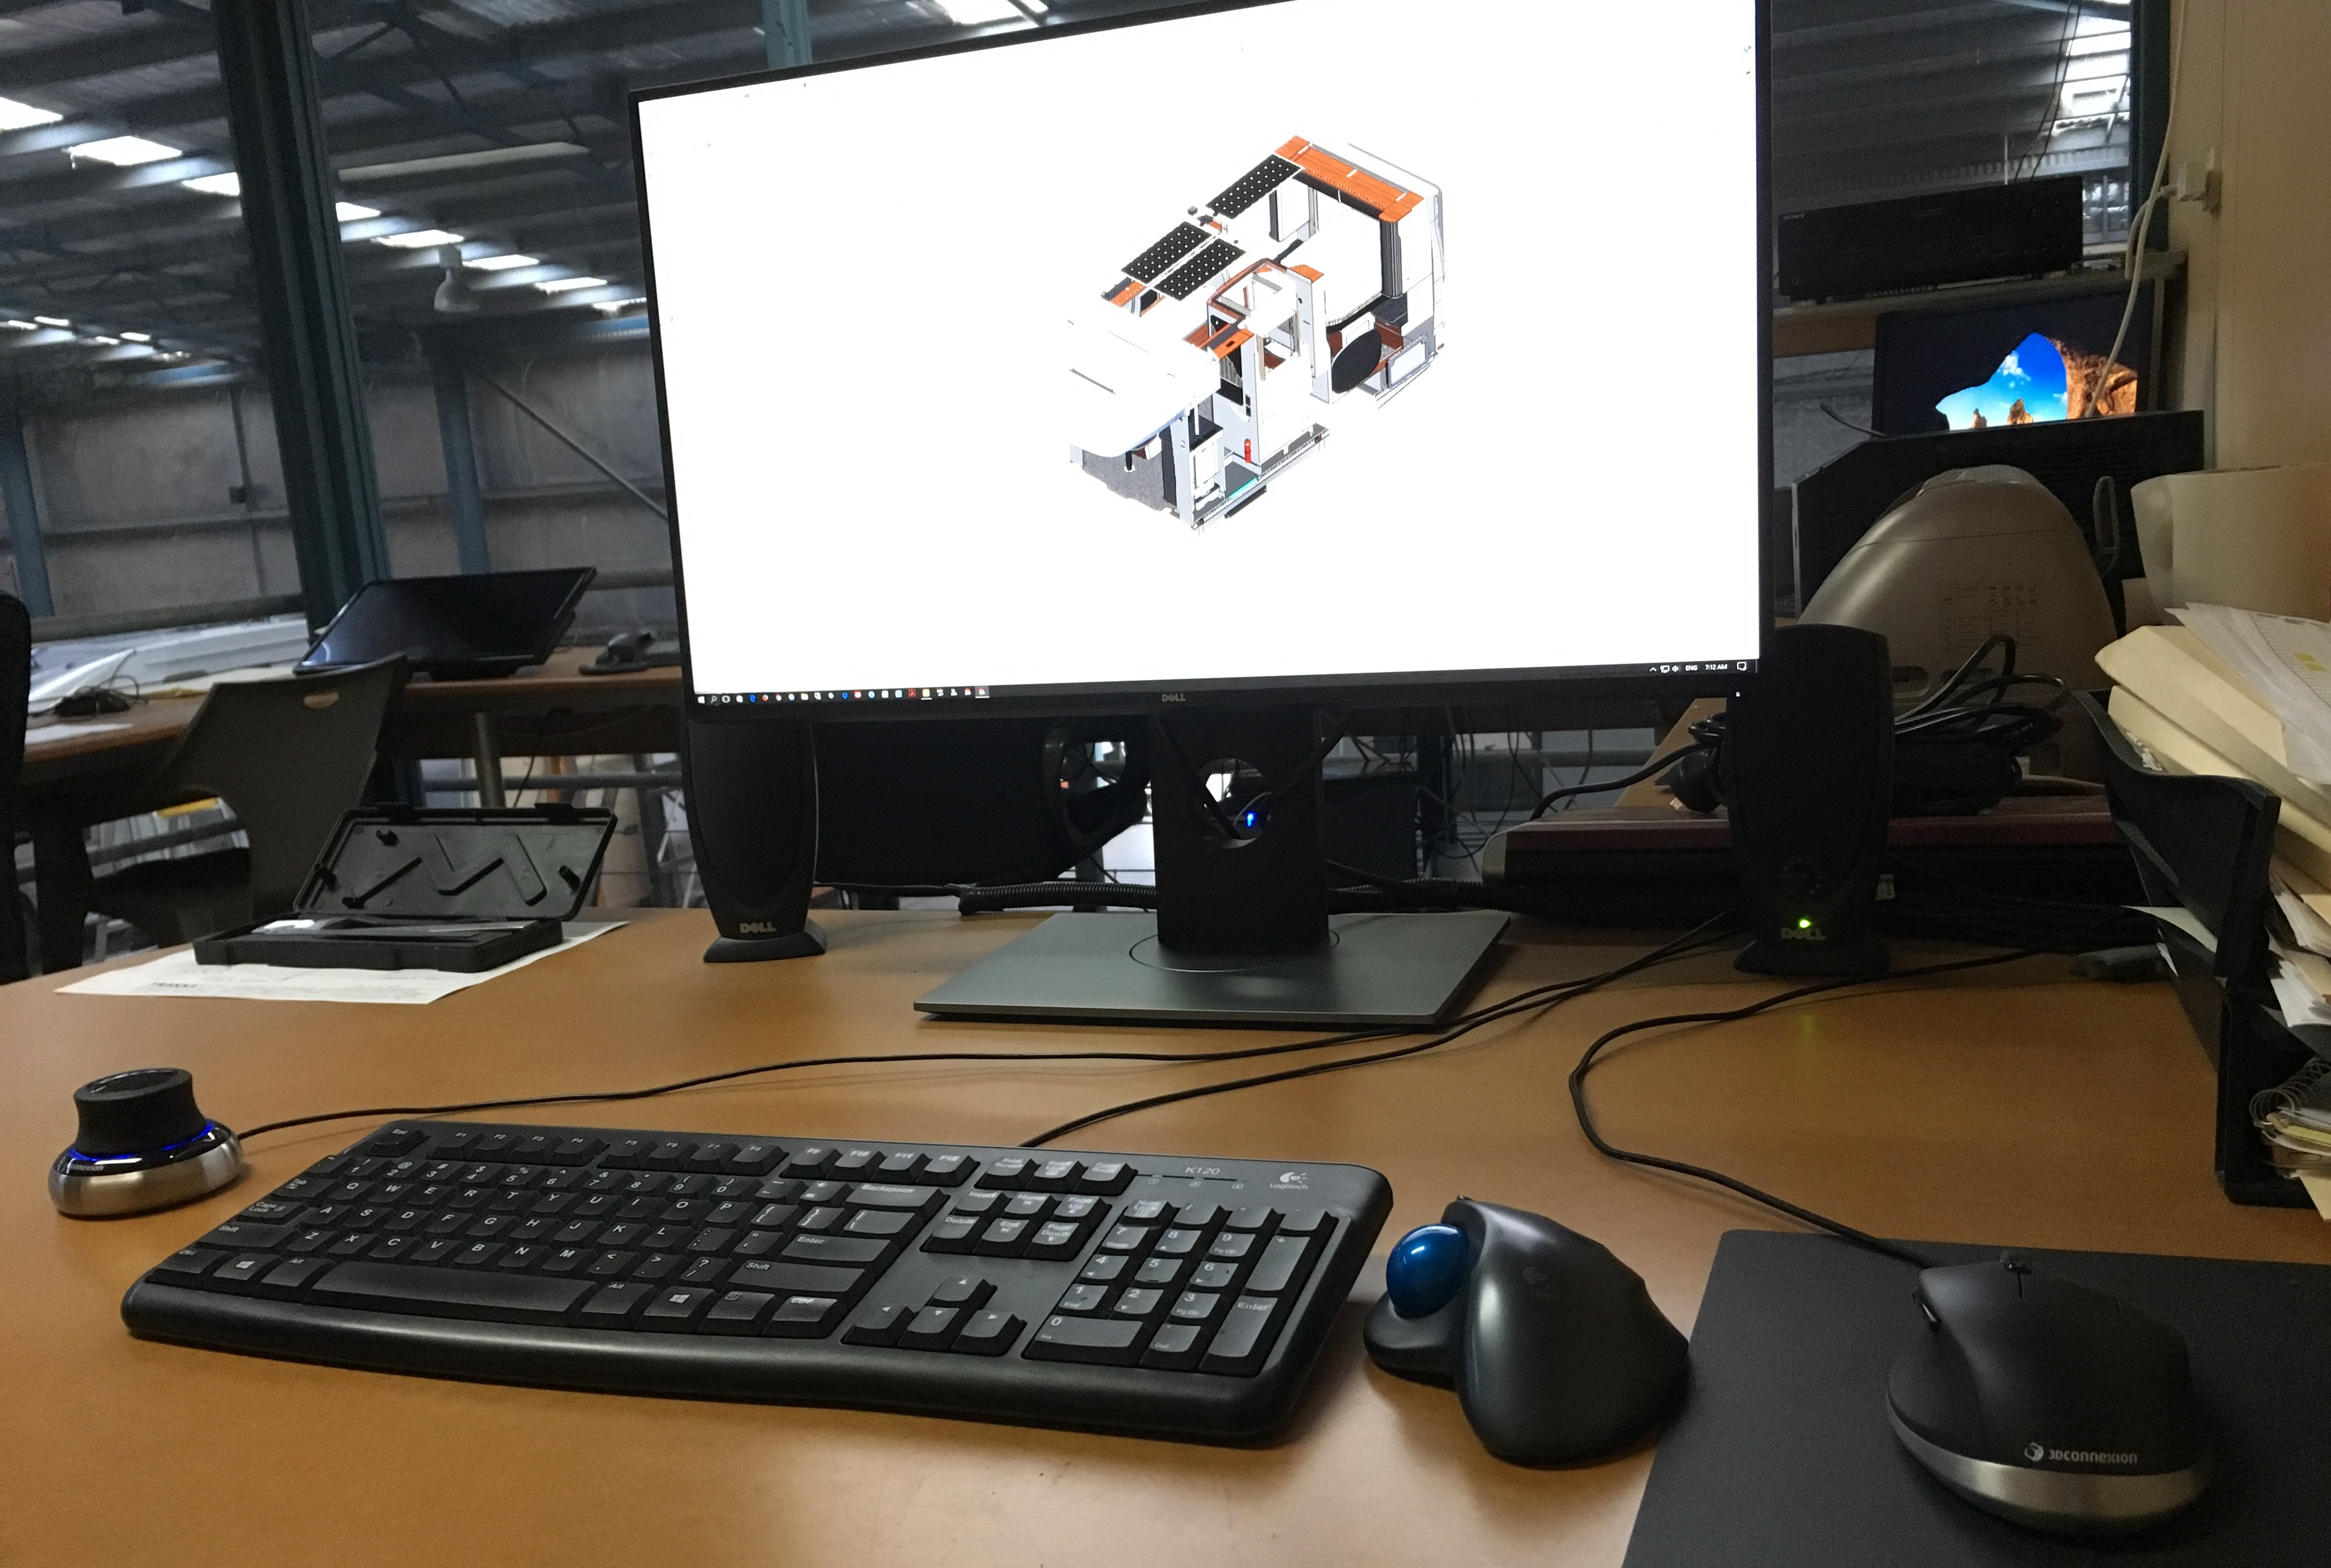 You will note that despite my advocacy for both my M570 Trackman and positioning of my left hand on the keyboard I do have a couple of 3dconnexion products. I have both a SpaceNavigator and a CadMouse I do use them in a limited capacity. But I do like having them around even if it is just to admire their engineering.
That’s how I have my SOLIDWORKS set up! Some of the settings go back to my early days of SOLIDWORKS, whilst others I’m still adapting to. Either way I continue to try and evolve & adapt with each new release of the product.
I’m always interested in how others work in the product and how you have your SOLIDWORKS set up. Let me know?

Leave a comment