
SOLIDWORKS 2018 is out of Beta and Pre-Release 1.0 is available to download for those on subscription
The SOLIDWORKS 2018 launch website is live and is highlighting many of the Top enhancement and new features.
The SOLIDWORKS 2018 release continues on the tradition of a mixture of new features and enhancement to existing tools. These enhancements are spread across the entire suite of the SOLIDWORKS product range. Whilst the “top” enhancements will be promoted throughout the many launch events, it are the smaller improvements which will have a greater impact on the day to day use of the product. Whilst it is hard not to mention the new features, I’ll try and cover many more of those smaller enhancements.
SOLIDWORKS 2018 sees some ongoing development of the User Interface. Impossible to miss is the new Welcome Dialog Box. When you open SOLIDWORKS 2018 you are greeted, in the centre of the screen, with the new welcome dialog box. It is divided into sections accessing New, Recent Documents, Recent Folders and the Open Folder on the Home Tab.  To access more than just the last five Recent documents or Recent Folder the Recent Tab can be selected. This is also accessed by the default “R” keyboard shortcut.
The Learn tab allows access to the Tutorials, MySolidWorks Training, 3D ContentCentral and access to the sample files
The Alert tab provides links to the various Technical Alert as well as the auto-recovery files in case of a crash. This is indicated by a Red dot to highlight the fact there is more than just the normal range of alerts.
Whilst the functionality of those may not be new, having them all centred is without doubt one of the most sensible additions I’ve seen to any User Interface. For many years now I have customised my interface and adapted my modelling techniques to minimise my mouse movement away from the centre of my screen. This simple addition certainly fits in with my workflow.
The big winner will be those who use Mouse Gestures. In the past mouse gestures could only be set to either 4 or 8 gestures. With SOLIDWORKS 2018 there is more versatility, with the ability to set the number of mouse gestures to 2, 3, 4, 6, 8 or 12. 
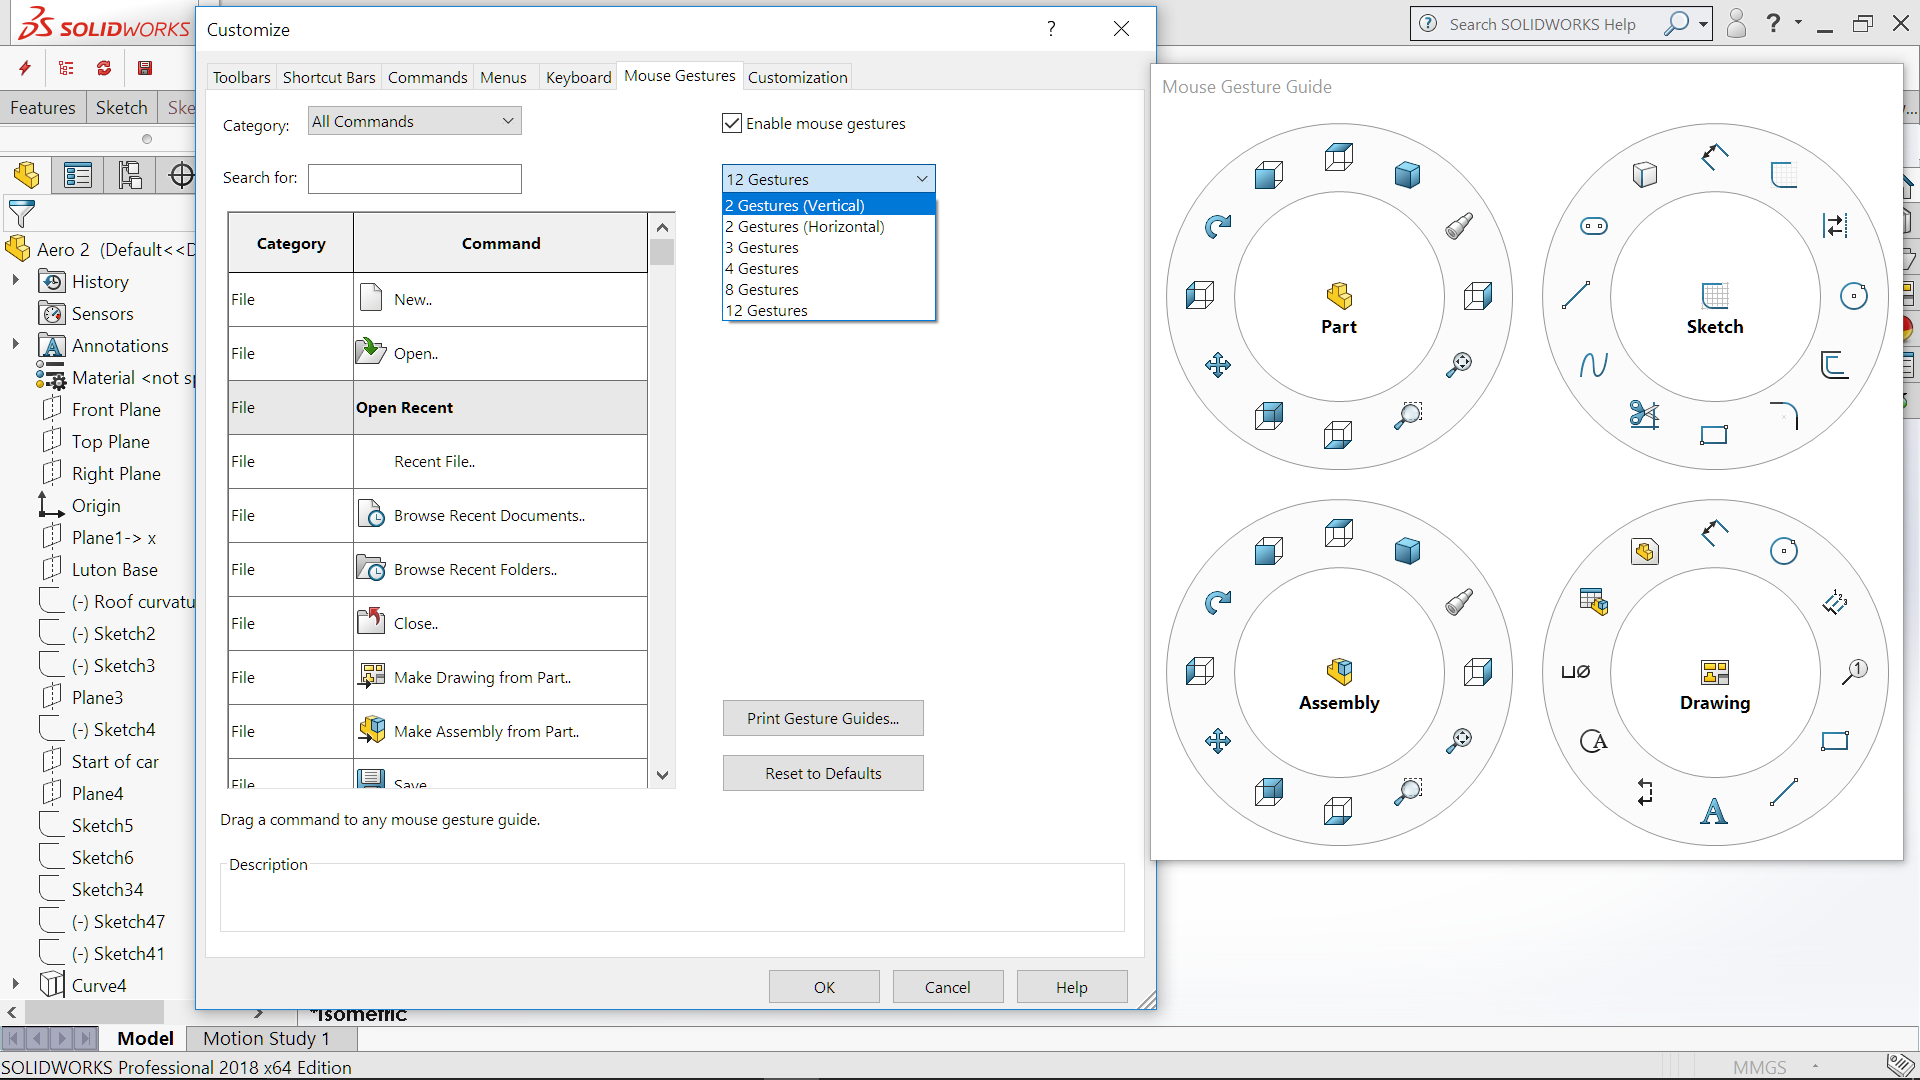 Assigning commands to mouse gestures has also been greatly improved. Previously there was the requirement to assign the position via a very small graphic display. This has now been greatly enhanced with a more conventional drag & drop of the commands into the required assigned position, on the visual Mouse Gesture Guide. The same drag & drop can be used to re-position the function locations on each of the wheels. Features can be dragged from wheel to wheel. Similar removing a function now only needs to be dragged & dropped off the wheel.
I’m a big user of Folders! The ability to group a number of features or parts into a Folder to identify or control those parts or features is a great way to stay organised within the FeatureManager. The disadvantage has been that suppressed or hidden features or parts cannot be easily seen. SOLIDWORKS 2018 changes all that by introducing Indicating Folders
 Folders now change colour to indicate features or parts that are Suppressed or Hidden are contained within the Folder. A Folder may be Blue (Usuppressed), Grey (Suppressed), White (Hidden) or a half or third combination showing what are contained in that Folder.
I have always had Auto-rotate view normal to sketch plane on sketch creation set in the options. No matter how your model is orientated, with a RMB selection on a face or a plane, the context toolbar displays and a new sketch can be started. This then automatically rotates so the selected face is normal to the sketch plane. SOLIDWORKS 2018 sees a nice enhancement to this option. This option is now available when you edit an existing sketch and the option has been renamed Auto-rotate view normal to sketch plane on sketch creation and sketch edit
Over the past few releases there has been small incremental enhancements with various Sketch tools. This release sees the enhancement to the Mirror Entities command, now adding the ability to Mirror 3D sketches. A 3D sketch can be Mirror about a Plane or a Planar Face. 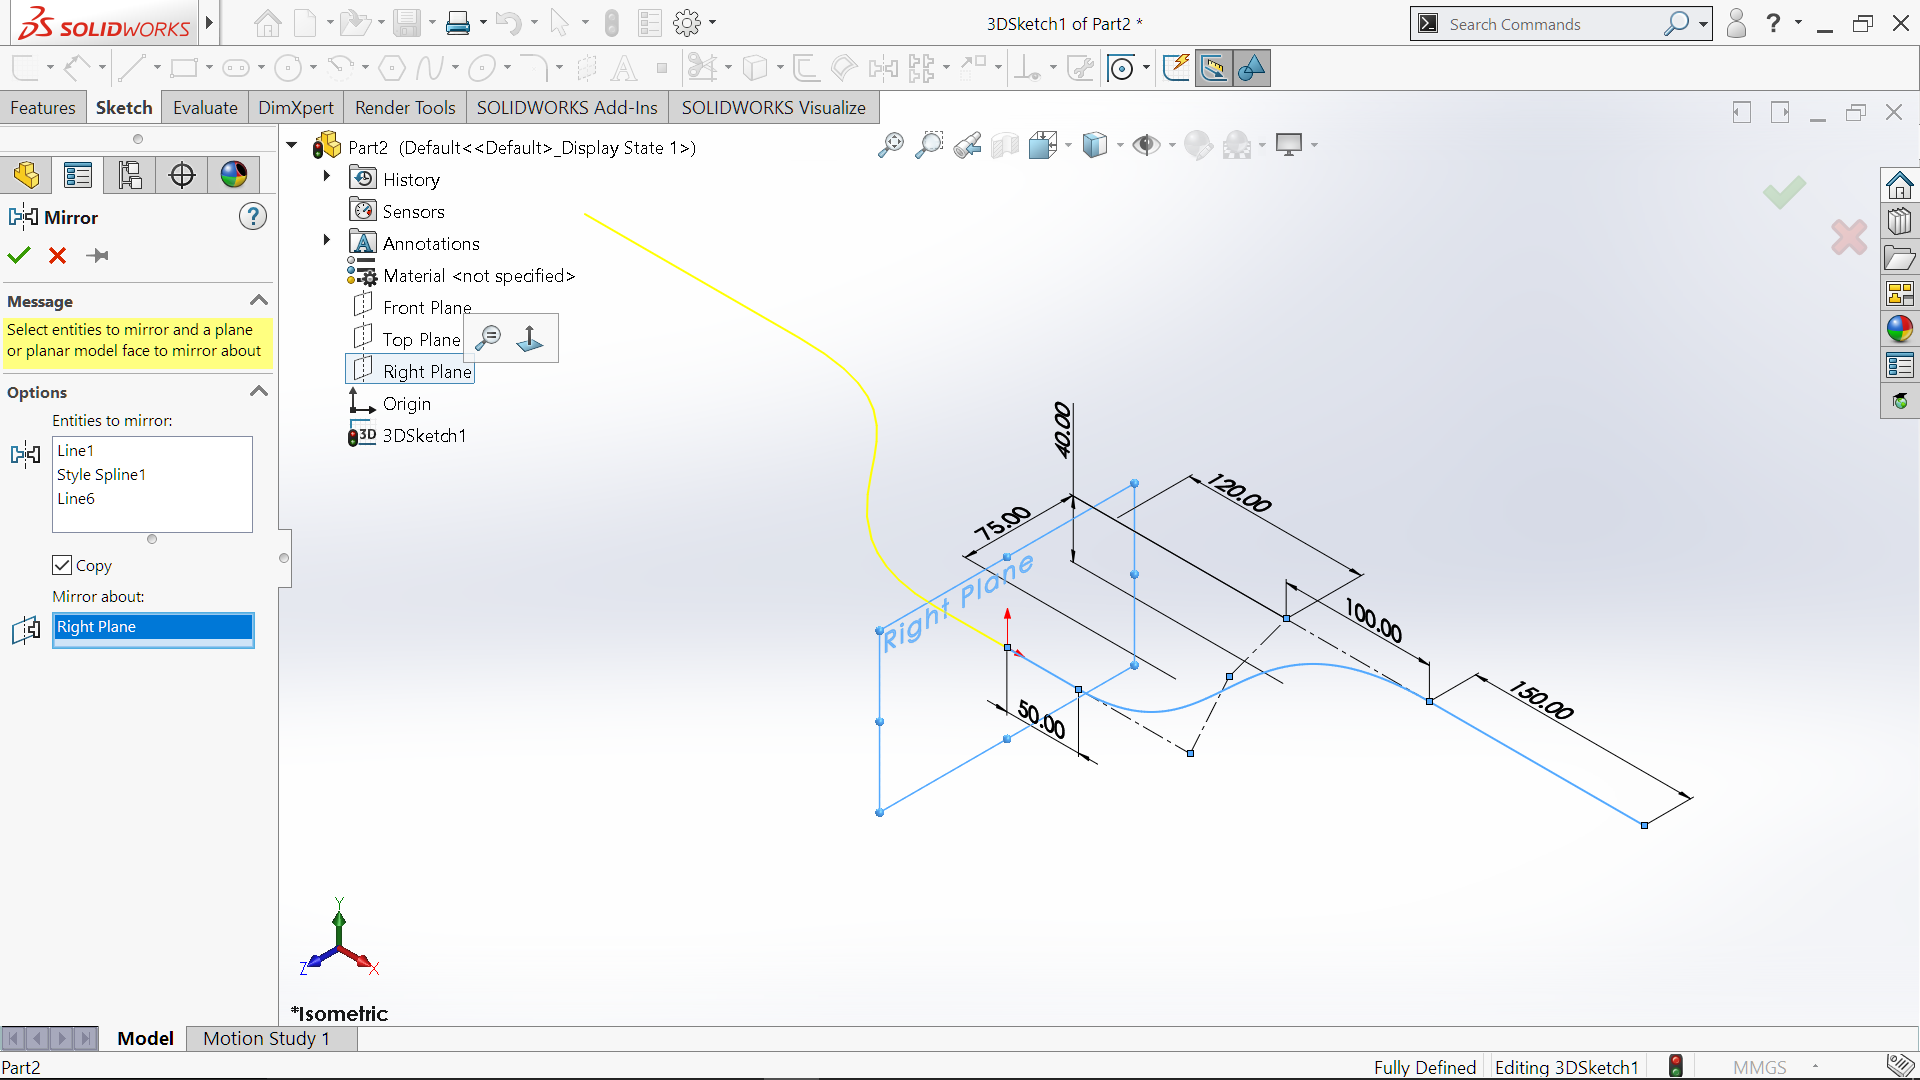 The bonus of this enhancement, is that 2D sketches can now be mirrored, with the same technique of using a plane or planar surface. Not just linear entities of lines or edges as per the past functionality.
I’ve been running SOLIDWORKS 2018 Beta on a new HP Spectre x360. A very non-CAD hybrid convertible laptop/ tablet. It’s been interesting, and I’ve been quite impressed with the performance of the machine. Windows 10 Creators Update saw the introduction of Window Ink and its enhanced use for pen and finger for sketching. SOLIDWORKS 2018 has been able to utilise this same functionality and have introduced the Sketch Ink toolbar
Using Sketch with Touch allows freehand finger (or pen/stylus) sketching. When used in conjunction with Auto Sketch Entities it enables the rough freehand sketch to be automatically converted into usable Lines, Arcs, Polygons, Circles and Ellipses.

 However Auto Sketch Entities doesn’t need to be enabled to convert a freehand sketch. By left mouse selecting a free hand sketch it allows the sketch to be Updated to Shape or Update to Entities
  For more detail DS SOLIDWORKS has the following video showing free hand sketching.
I’m not convinced that it is time, at this stage, to discard the mouse and go into full time freehand sketching. However, I can envisage doing design reviews, standing around a Microsoft Studio style of computer, deep in discussion and saying, “if we just reshape this corner” whilst sweeping a freehand arc across the model!
This I feel is also generational and whilst I personally see limited use, I am sure we will see greater touch tools being developed, over coming years and being adopted by the next generations of designers & engineers!
What I have found interesting is how quickly I have adapted to using a touch device. Although I continue to model in conventional methods, I find myself regularly using the touch capabilities to rotate and zoom around the model.
There is some interesting tinkering with dimensions from the Context toolbar. Preselection of entities is no longer supported by Smart Dimension from the context toolbar. It has been in part replaced by Auto Insert Dimension. The Auto Insert Dimension tool automatically inserts the most appropriate dimensions for sketch entities. If you select two lines and use the Context toolbar to add a parallel reference you can then select Auto Insert Dimension to add the dimension. Instead of the having to either re-select the lines and then selecting smart dimensions, or starting by first selecting Smart Dimension.
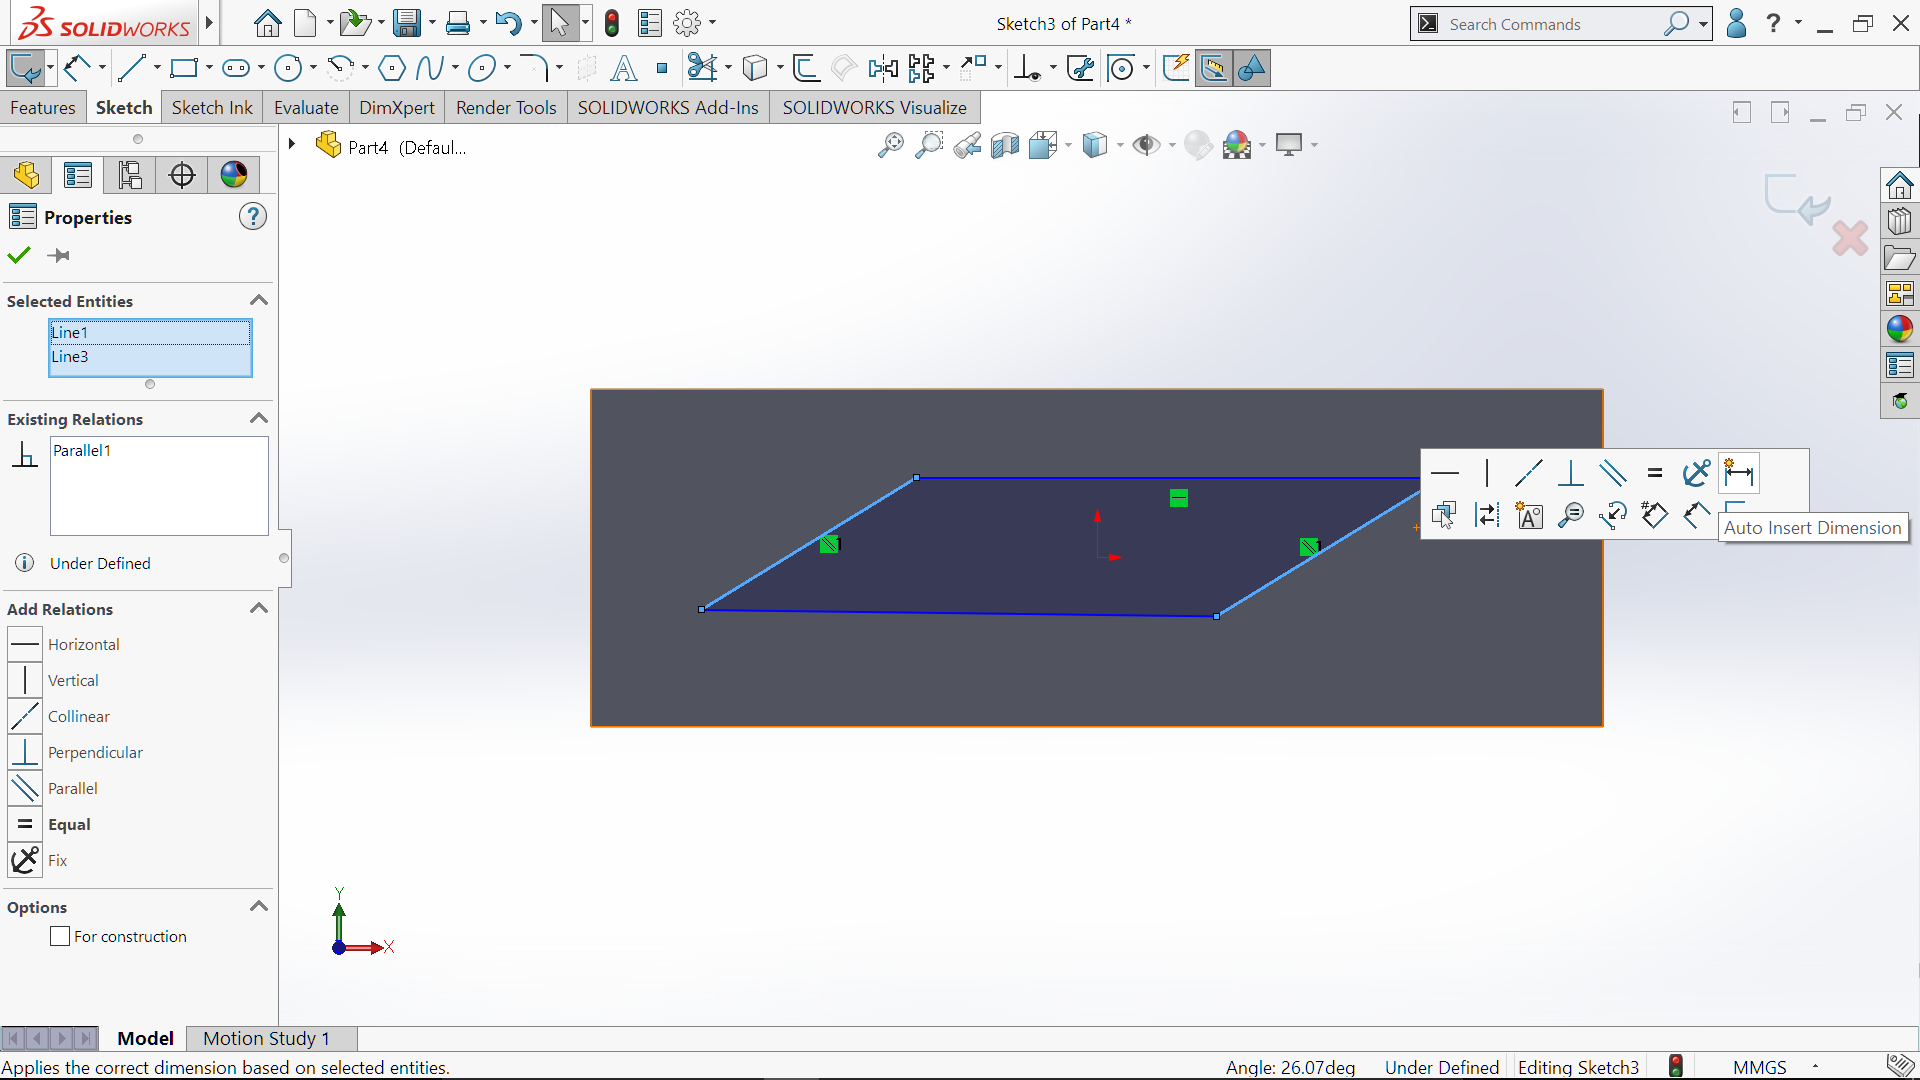 Auto Insert Dimension supports the creation of Linear dimension, Radial dimension, Diameter dimension, Angular dimension between entities, Linear dimension between entities , Linear dimension between line & center point, Linear dimension between line & point, Linear dimension between point & centre point along with Linear dimension between centre points.
With this first look I particularly like the two simple enhancements. The colour change to indicate the different states of parts or features in folder is a great time saver. Along with the addition of sketch edit, to the Auto-rotate view normal to sketch plane on sketch creation. This fits in nicely with how I like to work!
Next post I’ll have a look at some interesting development with Assemblies!

Leave a comment