
This is an updated post with the instructions on how to add your non-approved Graphic Card to the registry, to allow RealView for SOLIDWORKS 2023 & later:
For those who have been using Non-Approved graphics card with SOLIDWORKS over many years, would be aware of how and where to add your Graphics Card into the Registry to allow RealView to be activated.
This was until SOLIDWORKS 2023, where the instruction to add the graphic card to the location in the registry Registry Editor – Computer\HKEY_CURRENT_USER\Software\SolidWorks\SOLIDWORKS 20xx\Performance\Graphics\Hardware\Gl2Shaders was no long applicable, because the Graphics\Hardware\Gl2Shaders folder was no longer listed under Performance.
As I have been running a few versions of SOLIDWORKS including SOLIDWORKS 2024 Beta & now Pre-release, it was time to clean up a few things in the registry and I thought should have a look to see where the GI2Shaders folder may have been moved to.
It now can be found in a AllowedList located under:
Computer\HKEY_CURRENT_USER\SOFTWARE\SolidWorks\AllowList\Gl2Shaders
The original instructions below are then still applicable, to how you can add your Graphics Card to be listed as before.


Following is the original post with the instructions on how to add your non-approved Graphic Card to the registry for SOLIDWORKS 2022 & earlier:
I’m never been a big user of RealView Graphics in SOLIDWORKS.
For those not aware, RealView Graphics is hardware driven by the Graphic Card which supports advance shading, self shadowing and scene reflections. It are those scene reflection which is one of the reasons I don’t use RealView Graphics on a day to day bases whilst modeling. Selected faces tend to flair and overall the reflective surfaces are too bright for long hours in front of the screen.
There is one area that RealView Graphics becomes invaluable and that is with some SOLIDWORKS Appearances. There are a number of Appearances that require the use of RealView Graphics so they can display correctly. Without using RealView Graphics these appearances just display as a flat surface colour. Which does tend to makes them difficult to adjust!

You can run PhotoView 360 Preview to view and make the adjustments but it can be a slow process with the resources demands of the rendering process.

Realview Graphics are only available with graphic cards that have been approved to use with SOLIDWORKS.
There are many augments to be made in regards to using Approved Graphic Cards and they really should be considered for any computer used for business. However there are a wide range of computer out there. Including the rapid rise in the use of hybrid computers with the likes of the Microsoft Surface and Dell XPS. Included in that group is the HP Spectre x360 which I have as my personal computer. It is used for running Beta, presentation for my User Group and my own SOLIDWORKS learning.
These computers in the main all use integrated graphic cards, which are not approved and therefore don’t display RealView Graphics. There is a simple reason why RealView isn’t available with non-approved Graphic Cards. That is because they are not listed in the computer registry. Which means, that there is a very simple fix to allow the benefits of RealView Graphics in SOLIDWORKS.
That fix requires you to manually list your Graphic Card!
There are plenty of cautions about making changes to the Registry of your computer but to be honest I’ve never experience an issue when adding things to the Registry, especially this procedure.
Here are the steps to add the Graphic Card :
First open the Device Manager. With Windows 10 there are numerous ways to do this. The simplest is to select Cortana search or the Windows Icon and start to type. Open the Device Manager and navigate to Display adapter, select and display the name of the Graphic Card.
Then open Regedit Again the simplest way is via Cortana / Windows Icon search

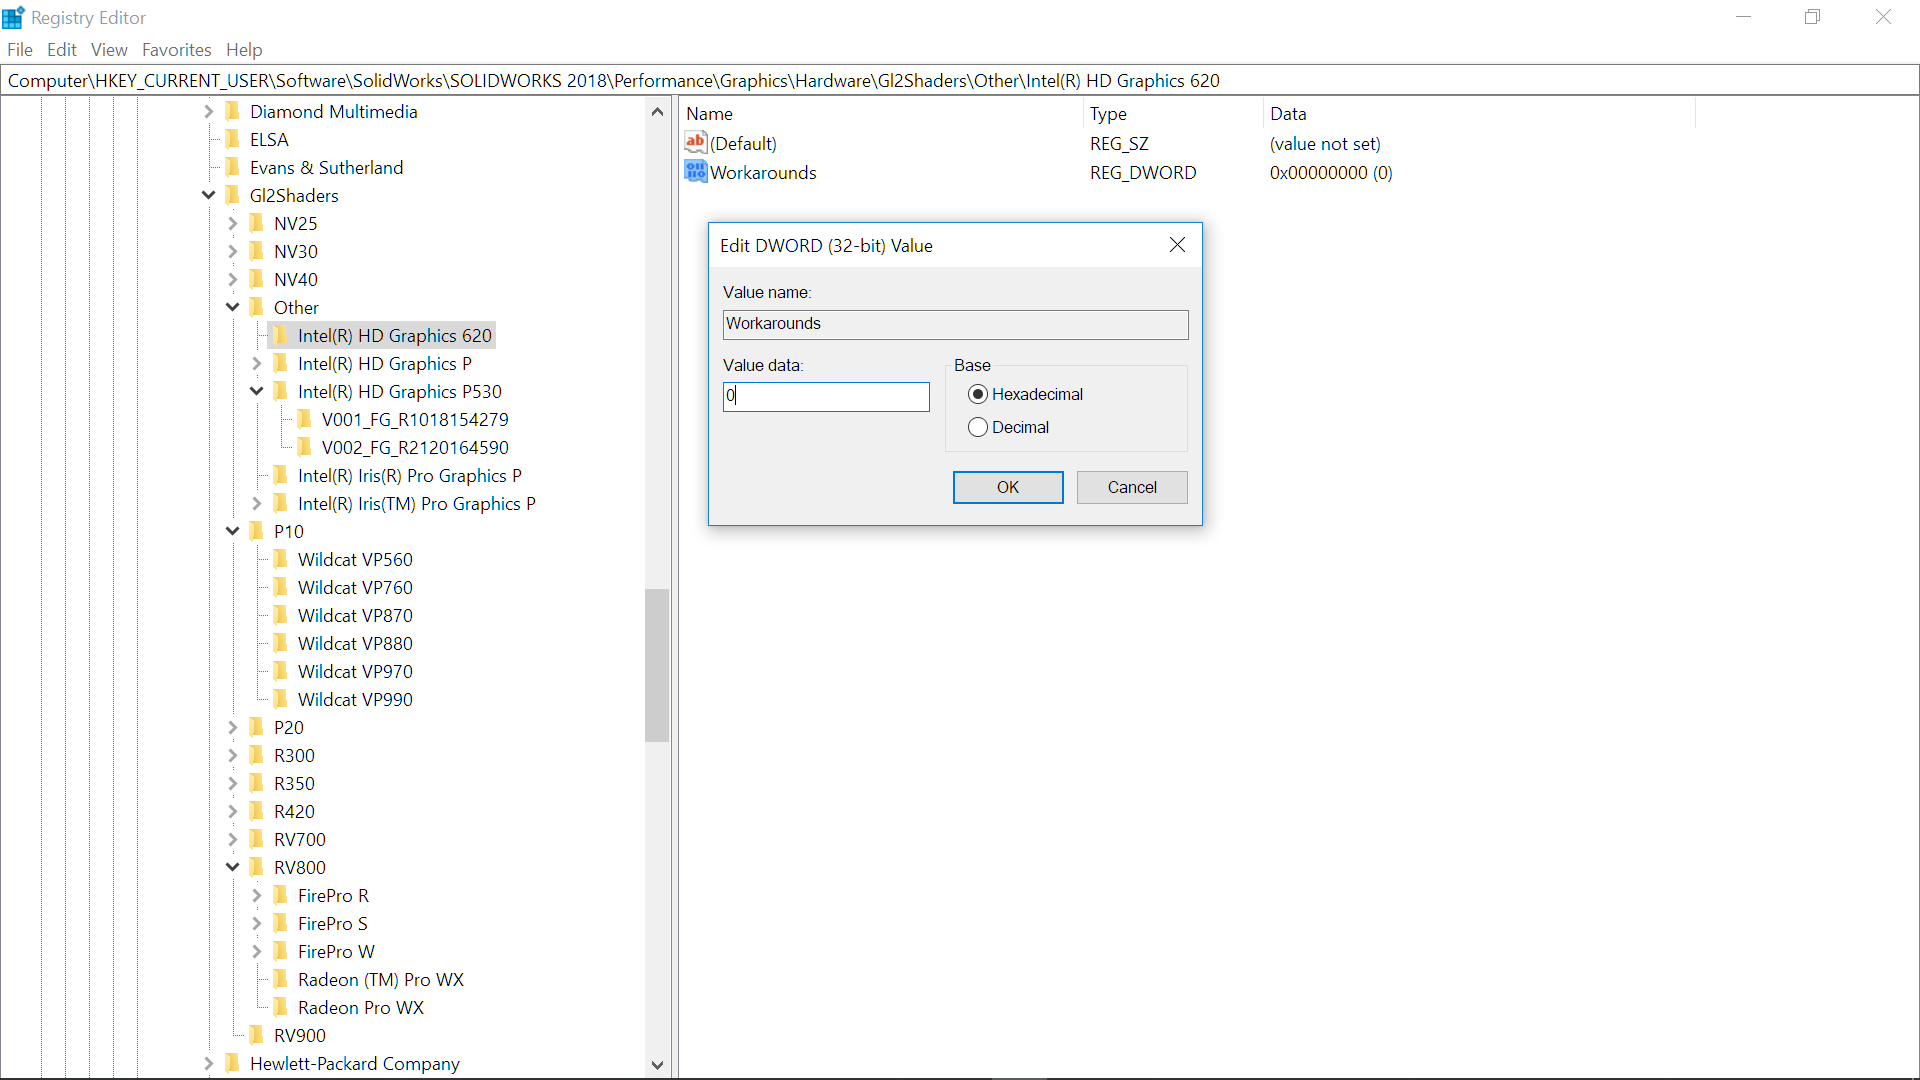
In the Registry Editor navigate to Computer\HKEY_CURRENT_USER\Software\SolidWorks\SOLIDWORKS 2018\Performance\Graphics\Hardware\Gl2Shaders
Or if you are not running SOLIDWORKS 2018 then the version of SOLIDWORKS you are using


Select and open the Gl2Shaders folder. There are a number of folders inside the Gl2Shaders folder and these are the list of approved Graphic Cards. The folders group the Makes and Model of the Approved Graphic Cards. You need to find the folder which is the closest match to your Graphic Card. The HP Spectre x360 uses the integrated Intel HD card and I find the Intel Cards listed in the Others

Right Button Mouse on the required Folder (in my case Other) and add a “New” – “Key” Name the key the exact name of your graphic card as you see it in the Device Manager including the spacing (In my case Intel(R) HD Graphics 620)

Right Button Mouse on the added Graphic Card and add a “New” – DWORD. Name the DWORD – Workarounds


Right Button Mouse on the Workarounds and Modify I have always left the Hexadecimal Value Data as 0. If you are adding a Graphic Card that is similar but not listed from NVIDIA or AMD you might need to check the Value Data of those similar cards and use that number.
Exit out of the Registry Editor and Open SOLIDWORKS! RealView Graphics should now show and be able to be activated.


As this is a manual entry to the Registry, it will need to be done after each Service Pack update.

Leave a comment